
There’s something truly magical about a slice of cheesecake. Its rich, creamy texture, combined with a buttery crust, is comforting on its own, but when topped with fresh, vibrant fruits like strawberries and kiwis, it transforms into an unforgettable treat. If you’ve never experienced the combination of sweet strawberries and tangy kiwis atop a luscious cheesecake, you’re in for a treat. The Strawberry Kiwi Cheesecake is a dessert that’s sure to captivate your taste buds, and this article will guide you through everything you need to know to create the perfect cheesecake that’s as delicious as it is beautiful.
Whether you’re baking for a special occasion, a casual gathering, or just because you’re craving something sweet, a Strawberry Kiwi Cheesecake is the ideal dessert. This cheesecake brings together a balance of sweetness and tartness, providing a flavor profile that’s as exciting as it is indulgent. So, let’s dive into why this dessert is so irresistible, how to make it, and some tips to ensure your cheesecake is always perfect.
What Makes Strawberry Kiwi Cheesecake So Irresistible?
The Sweet and Tangy Flavor Combination
What makes the Strawberry Kiwi Cheesecake so captivating is its perfect blend of sweet and tart flavors. The sweetness of ripe strawberries complements the tartness of kiwis, creating a balanced taste that’s not overwhelming. When combined with the creamy, rich cheesecake filling, the contrast between the fruits and the base creates an unforgettable harmony in every bite. The natural acidity of the kiwi enhances the richness of the cheesecake, making it taste lighter than it really is.
These vibrant fruits also provide a refreshing element, making this cheesecake a perfect dessert for any season, but especially in warmer months when you’re craving something cool and fruity.
A Perfect Dessert for Any Occasion
Whether you’re hosting a birthday party, celebrating a holiday, or simply want to make an ordinary day feel special, Strawberry Kiwi Cheesecake is the dessert to impress. Its vibrant colors immediately catch the eye, and its unique combination of flavors makes it stand out from traditional cheesecake options. You can easily elevate a simple gathering or meal with this stunning and delicious dessert.
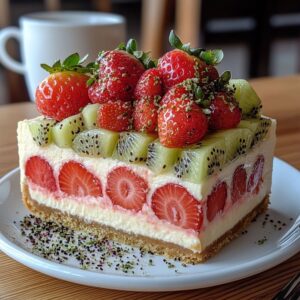
This cheesecake is versatile, too. You can cut it into small slices for a casual snack or serve it as a decadent dessert to end a fancy dinner. The beautiful topping of fresh strawberries and kiwis gives it a festive look, making it suitable for everything from casual get-togethers to formal occasions.
Eye-Catching Appearance
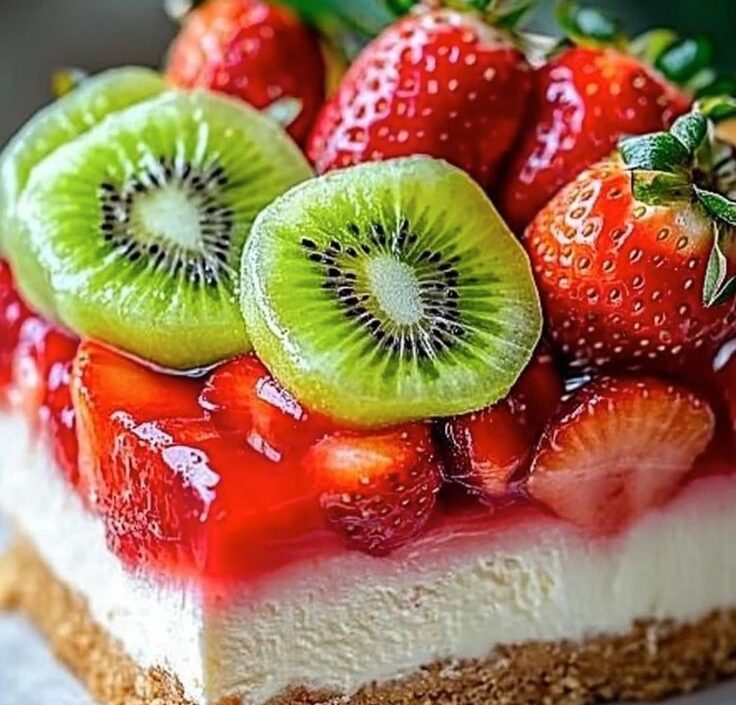
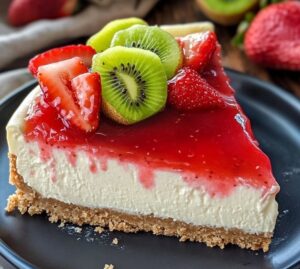
The visual appeal of the Strawberry Kiwi Cheesecake is undeniable. The deep red of the strawberries contrasts beautifully with the bright green of the kiwis, creating a colorful and inviting dessert. This vibrant topping is not only pleasing to the eyes but also enhances the overall appeal of the dish. It’s a cheesecake that looks as good as it tastes.
Ingredients for Strawberry Kiwi Cheesecake
One of the best things about Strawberry Kiwi Cheesecake is that it requires relatively simple ingredients, many of which you may already have in your kitchen. Below is a breakdown of the essential ingredients you’ll need to make this delicious dessert.
Essential Ingredients for the Crust
- Graham Cracker Crumbs: These provide the base for your cheesecake, offering a slightly sweet, crunchy texture.
- Butter (melted): The melted butter helps bind the crumbs together to form a sturdy crust.
- Sugar: This optional addition gives the crust a little extra sweetness and enhances the flavor.
For the Cheesecake Filling
- Cream Cheese: The star ingredient of any cheesecake, cream cheese creates the rich, creamy filling that’s the foundation of the dessert.
- Sour Cream: Adds a little tanginess to the filling, balancing out the richness of the cream cheese.
- Granulated Sugar: Sweetens the filling to perfection.
- Eggs: Eggs: Eggs offer assistance tie the filling and allow it structure.
- Vanilla Extract: For an added depth of flavor that complements the cream cheese.
For the Topping
- Fresh Strawberries: Use ripe, juicy strawberries for a naturally sweet and tangy topping.
- Fresh Kiwis: Fresh kiwis add a refreshing, slightly tart contrast to the sweet strawberries.
- Optional Fruit Glaze: A fruit glaze can be brushed over the fruit topping to give it a shiny, appetizing finish.
Below is a table for a quick look at the quantities and notes for each ingredient:
| Ingredient | Amount | Notes |
|---|---|---|
| For the Crust | ||
| Graham cracker crumbs | 1 ½ cups | Use store-bought or homemade |
| Butter (melted) | 6 tbsp | For a buttery, crunchy base |
| Sugar | 2 tbsp | Optional for extra sweetness |
| For the Cheesecake Filling | ||
| Cream cheese (softened) | 16 oz (2 packages) | Ensure it’s at room temperature |
| Sour cream | 1 cup | Adds tangy flavor |
| Granulated sugar | 1 cup | Sweeten to taste |
| Eggs | 3 large | Adds richness and structure |
| Vanilla extract | 2 tsp | For enhanced flavor |
| For the Topping | ||
| Fresh strawberries | 1 cup (sliced) | Use ripe, juicy strawberries |
| Fresh kiwis | 2 (peeled and sliced) | Fresh for vibrant color |
| Optional: Fruit glaze | ¼ cup | Adds sheen to the fruit topping |
How to Make Strawberry Kiwi Cheesecake from Scratch
Step 1: Prepare the Crust
Begin by preparing the crust. In a medium-sized bowl, combine the graham wafer pieces, liquefied butter, and sugar. Mix until the crumbs are fully coated with butter and the mixture sticks together. Press this mixture evenly into the bottom of a springform pan, ensuring it’s tightly packed. Bake the crust at 325°F for about 10 minutes or until it’s lightly golden and firm. Allow the hull to cool whereas you plan the filling.
Step 2: Make the Cheesecake Filling
For the filling, start by beating the softened cream cheese and granulated sugar together in a large mixing bowl until smooth. Add the eggs one at a time, blending completely after each expansion. Mix in the acrid cream and vanilla extricate until completely combined. The blend ought to be smooth and velvety with no lumps.
Step 3: Bake the Cheesecake
Pour the cheesecake filling over the cooled crust. Smooth the top with a spatula. Bake the cheesecake at 325°F for 50-60 minutes, or until the center is just slightly wobbly. You don’t want to overbake the cheesecake as it can crack. Once done, evacuate it from the stove and let it cool completely. Then, refrigerate for at least 4 hours or overnight to allow it to set properly.
Step 4: Prepare the Topping
Once your cheesecake has chilled, it’s time to add the beautiful fruit topping. Slice the strawberries and kiwis, arranging them on top of the cheesecake in an aesthetically pleasing pattern. If desired, brush the fruit with a fruit glaze to give it a glossy finish.
Tips and Tricks for the Perfect Strawberry Kiwi Cheesecake
- Use Room Temperature Ingredients: Ensure that your cream cheese, eggs, and sour cream are at room temperature before mixing. This makes a difference anticipate protuberances and makes a smoother filling.
- Avoid Overmixing: When mixing the cheesecake batter, be careful not to overmix. This can incorporate air, which might cause the cheesecake to crack during baking.
- Chill Thoroughly: For the best texture and flavor, refrigerate your cheesecake for at least 4 hours, but overnight is preferable. This gives it enough time to set and allows the flavors to meld together.
- Even Fruit Slices: Slice your fruit evenly for a professional, uniform look. This not only makes the cheesecake look more polished but ensures each bite has a balanced fruit-to-cheesecake ratio.
Variations of Strawberry Kiwi Cheesecake
If you want to get creative or have specific dietary needs, there are several variations of the Strawberry Kiwi Cheesecake that you can try:
No-Bake Strawberry Kiwi Cheesecake
If you’re looking for a simpler version, a no-bake Strawberry Kiwi Cheesecake is an excellent alternative. Skip the baking process altogether and simply chill the cheesecake filling. Use a store-bought graham cracker crust and whipped cream cheese for a lighter, no-fuss version of this delicious dessert.
Mini Strawberry Kiwi Cheesecakes
For parties or gatherings, individual-sized cheesecakes can be a real hit. You can make mini Strawberry Kiwi Cheesecakes in muffin tins or small jars, offering guests their own personal serving of this delectable dessert.
Vegan or Dairy-Free Option
If you’re following a vegan or dairy-free diet, you can still enjoy this dessert! Use coconut milk or cashew cream as a replacement for cream cheese, and opt for a gluten-free crust for a completely dairy-free version of the cheesecake.
Frequently Asked Questions about Strawberry Kiwi Cheesecake
Can I use frozen fruit for the topping?
Yes, frozen strawberries and kiwis can be used, but fresh fruit gives the best texture and appearance. If you choose to use frozen fruit, make sure to thaw and drain it thoroughly before using it as a topping.
Can I prepare the cheesecake in advance?
Absolutely! Strawberry Kiwi Cheesecake is perfect for making ahead of time. You can prepare the cheesecake the day before and let it chill overnight, giving it plenty of time to set.
What’s the best way to store leftover cheesecake?
Store leftover cheesecake in an airtight container in the refrigerator for up to 3-4 days. If you have leftover fruit topping, it’s best to add fresh fruit for the best texture and flavor.
Conclusion
The Strawberry Kiwi Cheesecake is a dessert that brings together the best of both worlds—the creamy indulgence of cheesecake and the refreshing, tangy flavors of fresh fruit. Whether you’re baking for a special occasion or treating yourself to something sweet, this cheesecake will never disappoint. With easy-to-follow instructions, tips for success, and a few variations to try, you’ll be able to create a show-stopping dessert every time. So, gather your ingredients, get baking, and enjoy a slice of this delightful dessert that’s sure to please everyone!
Call to Action:
Have you tried making Strawberry Kiwi Cheesecake before? Share your experience and any creative variations you’ve tried in the comments below! If you’re ready to make your own, grab your ingredients and start baking today! Your taste buds will thank you.